Pages

Wednesday, January 4, 2012

S is for Finished!

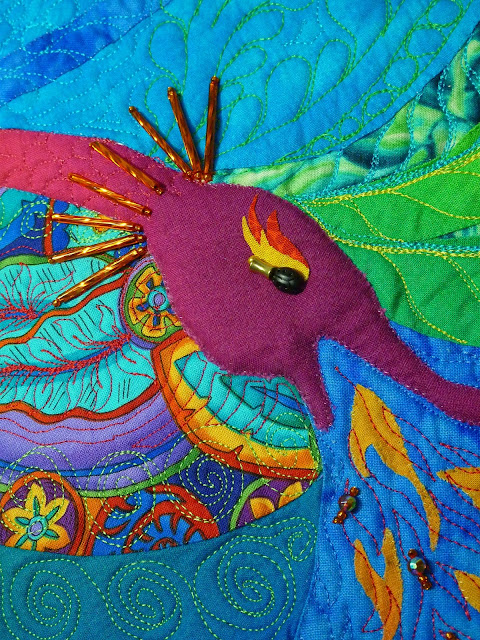
Ok, so S isn't really for finished but I am so excited.  I finished this quilt right before Christmas just in time for the deadline for the Oklahoma City Winter Quilt Show.  Any locals should head out and see it the weekend of January 12-14.   I feel like I've been working on this one forever but I'm really pleased with how it turned out, and I feel like I put a lot of work into making sure it turned out nicely with minimal mistakes.  It may sound weird, but I feel like I've done the best I could do with my current skills, and didn't cut any corners and that makes me proud.  For anyone interested in my (many) previous posts about this quilt, you can check them out (1, 2, 3, 4).

Sorry for the overabundance of pictures, I'm just so excited I have to show you bunches of them!

S is for... #2, c. Shannon Conley, 2011.  27.5" x  30.5"


I'm linking up with several of the regular places and also Works In Progress Wednesday, even though this isn't in progress any more.  The ladies over there have been so encouraging throughout this process I want them to see the finished thing too!  Rest assured there will be more actual WIPs next week!

Monday, January 2, 2012

Wipeable Placemats! Beware the vinyl....

My sister mentioned several months ago that she was looking for some cheap wipeable placemats like you'd get at Walmart with count to ten or ABCs on them.  She didn't have any particular interest in kid placemats, I think she was just tired of washing cloth ones all the time and perhaps was thinking about the soon-to-arrive new baby.  Anyway, she just recently repainted/decorated her kitchen and breakfast area, so I decided to make her some wipeable placemats for Christmas.

Now I know there is really great vinyl coated fabric out there, in fact Jess of How About Orange has some fabulous vinyl  fabric, but I didn't even think about that until I after I had bought a couple of yards of clear cover-the-furniture-at-your-grandmother's-house vinyl.

First observational note,  do not iron the vinyl!  Even with my iron on medium-low and ironing through parchment paper the heat was enough to warp it out of shape.  One poor placemat has a rumpled back because I didn't have quite enough to not use all the stuff I warped.

Second observational note, you cannot pin vinyl without leaving wretched holes.  If you need to hold it together bobby pins work well.

Third observational note, it is very very  hard to turn under 1/4 edge on vinyl around a placemat and have it stay.  I'd recommend another finishing method (I went with double-fold bias tape).

Final observational note, it doesn't like to feed too well through the sewing machine.  My machine sewed through it fine, it just didn't like to feed properly.

So with those warnings out of the way,  here are the placemats.  I made them in sets of two; one positive and one negative.  All the bases are made out of purple/pink prints and then the top layer is a green shape or the background left over when the green shape is cut out.  I blanket stitched around the shapes and then covered both sides with the vinyl and bound them.  This project took way longer than I thought it would, but I think they turned out nicely (except for a few glitches with the binding).  The placemats were hard to photograph due to the reflective surface,  but here are a few pictures.


Thanks for stopping by!

Wednesday, December 28, 2011

Christmas Pouches for the Kellys

I hope everyone is having a very Merry and Joyful Christmas!  Just a quickie post for you today, I'm still away celebrating with my family in New Mexico.

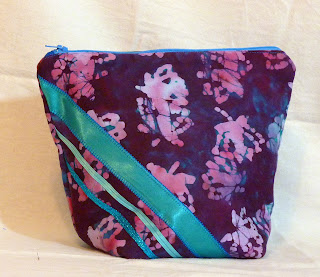
I thought I'd share these pouches that I made as gifts for two young friends of mine.  I made a pouch for their mom for her birthday a few months ago and she seemed to think her daughter might try to steal it, so I thought I'd make the kids their own.  I asked her what their favorite colors were and was told purple and green/yellow, so here's what I came up with out of my stash.  The pouches are bigger than my usual pseudo-cosmetic size but not that big,  probably about 7-8 inches by 9-10 inches.  I just made them using the same process I always do.  I hope they like them!


Monday, December 26, 2011

Ornaments for the Boys

I hope as many of you as possible are still enjoying relaxing holiday time with your families.  Or, if your family is anything like mine, that you are enjoying fabulous-but-not-relaxing holiday time.  I thought I'd just drop in a put up a quick post about some ornaments I made this year as Christmas presents since they've now been given to their recipients.

This is Mike and I's third Christmas together and every year I've made him an ornament.  They're usually non-traditional things since he doesn't much go in for normal crafty Christmas decorations.  This year I was casting around for an idea and settled on the Sons of Anarchy.  For those of you who don't know, Sons of Anarchy is a TV drama about a criminal motorcycle gang.  It's actually a pretty good drama, but I don't really watch it.  Mike watches is all the time though, and I thought the juxtaposition of the crazy Sons of Anarchy logo with the jollity of a Christmas ornament was actually entertaining.  The back says Merry Christmas from SAMCRO (sons of anarchy  motorcycle club redwood original).


 I also made up this cute Texas Rangers ornament for my brother-in-law.  I didn't have much for his stocking except a chocolate bar dressed as a penguin, but he's a big Ranger's fan so I thought this would be cute and sort of manly.  Sadly, I was having a disagreement with my sewing machine the day I made these, so the execution isn't perfect, but I think they're cute anyway.


Happy second day of Christmas!  Any turtle doves around?

Friday, December 23, 2011

Merry Christmas

I just wanted to stop in and say Merry Christmas to all of you who stop by my small corner of the internet.  I'm so grateful and blessed to be able to spend this holiday with my wonderful family, and I hope you are all able to celebrate in whatever way brings you joy.

I can't believe it's already been seven months since I started blogging, it seems like yesterday when I wrote my first post.  It's been wonderful to start to make bloggy friends; you guys are such a great source of inspiration and creativity!

Merry Christmas from our family to yours!
All the best-
Shannon, Mike, and the Mutts

Wednesday, December 21, 2011

Mug Rugs for Santa Ministry

This is my last crafty post before Christmas.  I can't believe it's almost here!

Every year at Advent one of the ministries of the outreach group at our church is the Santa Ministry.  It has a bunch of different parts, but one part is to provide gifts for elderly or disabled nursing home residents without families.  They hang all the names on a tree with an ornament made by the youth group and a list of suggested items for the person.  Usually it's things like clothes or house shoes or pajamas, mostly practical items.  Anyway,  I usually pull a couple of names and each year try to put a little something fun or handcrafted in the present as well as the more useful things.

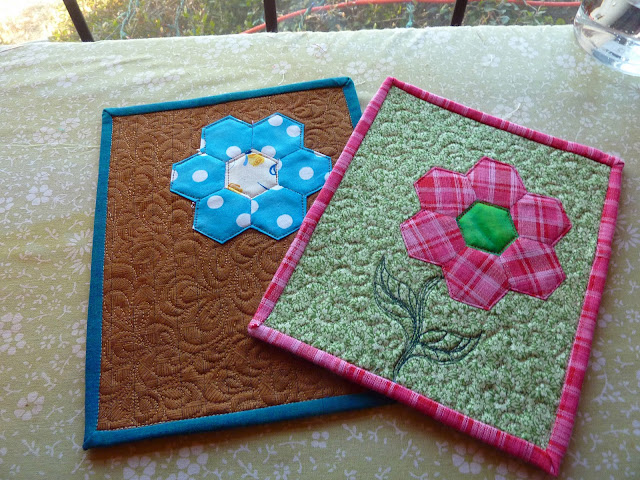
This year I decided to make mug rugs for them.  I was trying to decide on some simple pretty patchwork when my eye fell on some grandmother's flower garden blocks pinned to my wall.  They've been sitting there since April when I first learned English paper piecing and I'd not decided what to do with them.  You may recall them being an item on my summer UFO list!  Anyway, several are still there but I thought these two made cute and colorful mug rugs.


I hope these are well-liked by their recipients Joyce and Pete and that they can bring a bit of color and fun into their Christmas.


Monday, December 19, 2011

Group Christmas Quilt

I wanted to share this quilt with you today; it was my family's first attempt at a group quilt.  My mom taught both my sister and me to quilt, and although Becky doesn't quilt as much as my mom and I do, she has done quite a few projects, including this one.

We were inspired to make this after seeing the fabulous panel quilts at the Dallas Quilt Festival in 2008, and we finished it in 2009.  The idea was that we would take a single picture, blow it up, and each take two parts.  Then when reassembled, they'd make one unified quilt.

We chose this nativity from a copyright-free dover coloring book, and divided it up.  We made our blocks independently with no knowledge of what techniques or colors the others were using.  My mom had the unfortunate task of having to reassemble it, and she said that I didn't do a very good job of staying in the lines.  Not so much a problem artistically speaking, but definitely a problem in terms of assembly of a unified finished piece!

Group Nativity, c. 2009 36" x 51"

I made the top right panel (the monochrome black and white one) and the middle bottom.  I'm sorry I don't have any more detailed pictures. I love that the cow is black in my section and brown in my Mom's sections!  I thought that doing the monochromatic stained glass look in one of my sections would provide something different. I was hoping that by making baby Jesus the only thing colored, that he would draw the focus.  I think it would have worked better if the whole quilt had been that theme, but in this case I think that block doesn't go well with the rest.  This is a really fun quilt up close, we used lots of different fabrics for it: silks, quilting fabrics, home-dec stuff, furry things, etc.  All kinds of small leftovers from other projects, so the surface has lots of texture.  

I hope you enjoy!  Have any of you made group quilts like this?  How'd it go?