Pages

Showing posts with label Quilts. Show all posts

Friday, November 16, 2012

Quilting Fail

I thought I would take a moment to share with you guys my most recent series of quilting fails.  Womp Womp.  

 I consider myself an intermediate quilter and I really feel like I should be past some of these problems by now.  Alas, they are my own fault.  You may recall my gold angels quilted onto the Nativity quilt from last week? Well, I decided I should quilt some rings of echo quilting around them in blue to add some texture.  I started with a ring of radiating lines, and followed up with a ring of pebbles.  On the first angel I did the lines and pebbles, quilting along just fine, but was having real difficulty seeing where I was going, as the blue thread on blue fabric/tulle was pretty tough.

I thought it was going well until I flipped it over to the back.  Total quilting fail.  What a disaster,  it looked terrible!  All my pebbles were outside the lines and not touching, and my radiating lines stuck out everywhere and were weirdly spaced.  Even worse, I had a giant pucker in the backing (arrows) covered up with bunches of quilting.  It occurred to me that as the front was fairly stiff and not pucker prone, and that as my quilting showed up better from the back (so I could see where I was going), that maybe I should just quilt from the back.  Duh.  So I went back over the bad angel to try to fix the worst of the mess with the radiating lines.  What you see below is after I fixed it.  yick.


So then I went over to the other angel and painstakingly did the blue quilting all from the back.  Not perfect but definitely better.  So, score one for quilting from the back in this case.


And then I went back to the front.  Total quilting fail.  Do you know why?  Because after all that irritation and planning and ripping and trying to correct from the back, YOU CAN'T EVEN SEE THE QUILTING ON THE FRONT!!  When I take a picture from six inches away (the two top pictures), you can kind of tell which is the good one and which is the bad one.   From a foot away, (bottom pictures), you can kind of tell there's some quilting there around the angel, but your guess is as good as mine whether that's the "bad" angel or the "good" angel.  And from any farther away from that, you can't tell there's any quilting around the angel at all.  Talk about bad planning!  I could have just stippled the whole thing and you'd never know the difference.  No color contrast (which I knew there wouldn't be), but also no texture contrast (what I was going for), I think because the pattern of the tiles and the texture of the tulle just obscure it.


So not sure what the lesson here is, except plan better.  And, sadly I think, don't spray baste a quilt this big.  So how are you guys?   Any quilting fails out there in other corners of blogland lately?


Monday, November 5, 2012

Tour of Honor Mini Quilt

Mike participated this year in the 2012 Tour of Honor Motorcycle Ride.  

From their website: "The event is a season-long, self-directed ride to memorials and monuments around the continental U.S. and Hawaii, with more than 35 states participating in 2013. Beginning April 1, visit as many sites as you want, with any route you choose."

There are hundreds of sites to visit, all over the country, but he made it to all seven in Oklahoma this year.  He asked me to make him something with the pictures he took for the project, so I made him this mini-quilt.  He wanted me to take his picture holding the quilt but said something about wanting to remain anonymous on the blog today because of his hat?  It didn't make much sense to me but I swirlied his face.


The sashing is all 3/4" and I practiced different fillers in each piece.  They're all the same fabric, not sure why all the blues look different.


One of the main things I realized is that I can't free motion quilt over the printed fabric sheets.  I use the June Tailor ones from Hobby Lobby, and I've done lots of projects with them before but I've never tried to FMQ.  In the past we've just quilted 1/4" inside the pictures (with a walking foot), but on some of the larger photo quilts I've made the pictures are really starting to sag so I wanted there to be more quilting.  I wasn't trying to do anything complicated, just a medium sized stipple, but my thread was breaking like mad and skipping stitches.  I tried switching needles, I tried switching from monofilament to the YLI 110wt silk thread, but nothing helped.  I thought initially it might be my sewing machine, but as soon as I switched to a practice sandwich the quilting was no problem.  I finally decided it was just the really stiff material.  It might have worked better with stronger/thicker thread, but I didn't want anything to obscure the pictures, so I switched back to my walking foot and just quilted a loose square spiral with the YLI silk in variegated light green.  That worked ok, but if I ever do another photo project where I know I need to FMQ I'm going to try a different approach.

I think Mike really liked it, he was very excited to hang it on the wall in the bedroom, although mostly I think because it got to replace S is For...#2 (or the vomiting dragon quilt as he calls it).  I moved the vomiting dragon into the studio; it's one of my favorites, but he really hates it, so this is better.  Hope you enjoy!


Monday, September 24, 2012

Seymour is Finished!

You guys-  I feel like there should be a party!  Pardon the melodrama but I feel like I've poured all my creativity and time and energy into Seymour and now he's complete and finished and wonderful.  I've never worked so long and so focused on something so personal.  I've had quilts that have taken longer, but mostly because they've languished as UFOs for years in closets.  I checked; my first post on Seymour was April 10th; since then I've focused almost entirely (with only a few small-project breaks) on him.  One of the most startling thing about this project was how challenging each step was.  Rather than taking forever because I needed a million blocks or something, almost ever step required something different; figuring out how to accomplish what I wanted, how to optimize some technique I'd never tried before, or how to tackle something with my particular resources.  There was a TON of make-it-up-as-you-go-along, and I dare say many experienced quilt artists would have known exactly what to do.

In any case, here he is.  For those of you who've been following since the beginning, thanks for sticking around.  And for anyone just clicking through for the first time, I've been posting about Seymour fairly regularly, so for more info just click on his tag in my sidebar.  The final quilt is designed to be laced together to display back to back or unlaced to be displayed as a diptych.

Here's my artist statement:

S is For… #3: You Cleared My Name
24” x 70”, 2012
Shannon Conley

Coelophysis bauri, a carnivorous theropod dinosaur, is the state fossil of New Mexico due primarily to discovery of a large number of skeletons near Ghost Ranch, NM.  Coelophysis had long been the poster child for dinosaur cannibalism until work published by Nesbitt et al. in Biology Letters (2006) demonstrated clearly that stomach contents from mature Coelophysis were not juveniles of the same species or even dinosaurs at all, but rather were unrelated early crocodylomorph archosaurs.  In honor of Coelophysis’ “cleared name” I created this original art quilt depicting him, at approxmately full size. He is shown in his modern-day home (in front of Chimney Rock) on one side and in a more Triassic setting on the other side.  The quilt is made of commercially available fabrics of all types and embellished with twine, trim, wool roving, beads, dryer sheets, polymer clay, and paint sticks.


Here's a close up of the label and the eye and teeth which I haven't shown before.  The label shows a map of New Mexico with the Zia sun symbol over the area where the Coelophysis remains were discovered.  The teeth are polymer clay; I made them as beads and then sewed them to the quilt.


Thanks to everybody in blogland for all your encouragment!  I'm linking up everywhere this week since so many kind people from lots of different places have supported me.

Friday, September 21, 2012

Baby Quilt for Casey

I was lucky enough to be the recent winner of a giveaway hosted by the lovely Heidi. She blogs about quilting and longarming and crafting and family over at Buttons and Butterflies.  I love her blog and her writing style, you should check it out.  Anyway, she sent me a bundle of super cute fat quarters from Amy Butler and Dena Fishbein.  Alas, I forgot to take a picture before I cut it up.

I was so excited because last Thursday I got a baby shower invitation for Mike's niece Casey who's having a little baby girl pretty soon.  The fabrics from Heidi were just perfect; I cut them up and put them back together without much plan but I like the way it turned out.  It's 40" square and backed with some Amy Butler from my stash.


Thanks again Heidi!


Monday, September 17, 2012

Adding Texture in the Foreground

Seymour is almost completely finished; just a few final touches and I'm declaring him done!  I've been working on the foreground the last couple of days and thought I'd share a few things I've added to the quilt since they use a couple of different techniques to add some texture.

Barrel Cacti

This is the easiest one of all; for the cactus I sketched out the size of barrel cacti I wanted (interestingly in pencil sketches they look almost indistinguishable from stem-less pumpkins), then cut them out of green fusible-backed fabric.  I drew the ribs with my white erasable marking pencil, and then shaded each alternating rib with my trusty beige Shiva paintstick.  I fused the cacti down and thread painted/FMQed the rest.  I used 4 different thread colors on the big cactus and two on the little cactus to try to give a semblance of dimension.


Sagebrush Bush

For the trunk/woody part of my sagebrush, I used fusible-backed brown fabrics and some jute/twine I had leftover from a macrame project.  I left some of the twine pieces intact, and separated others into fibers.  Before proceeding with the bushy part, I FMQed down the stems/twine.  I wanted to try using wool roving for the leafy portion of my bush since I like its fuzzy feel.  I'd never worked with roving before; I think it's mostly used for felting.  I picked up a couple of hand-dyed sample packs at MQS this year and was anxious to try it.  It feels and looks like a slightly denser cotton ball material; I just pulled off bits of different colors and spread them out over the surface of the quilt.  The next part was a bit of a disaster.  I first tried just quilting down the fibers but they kept getting all wrapped up and tangled in my foot.  Then I tried covering a section with parchment paper and quilting over it; that made the quilting go easily but it was impossible to get the paper off without pulling up all the fibers.  I actually had to rip out all that quilting.  I finally wound up covering most of the bush with small pieces of tulle.  They didn't quilt down particularly flat, but the bumpy bits combined with the places where the roving isn't covered give very nice bushy texture.  Anyone else have experience trying to quilt down roving?


Fern

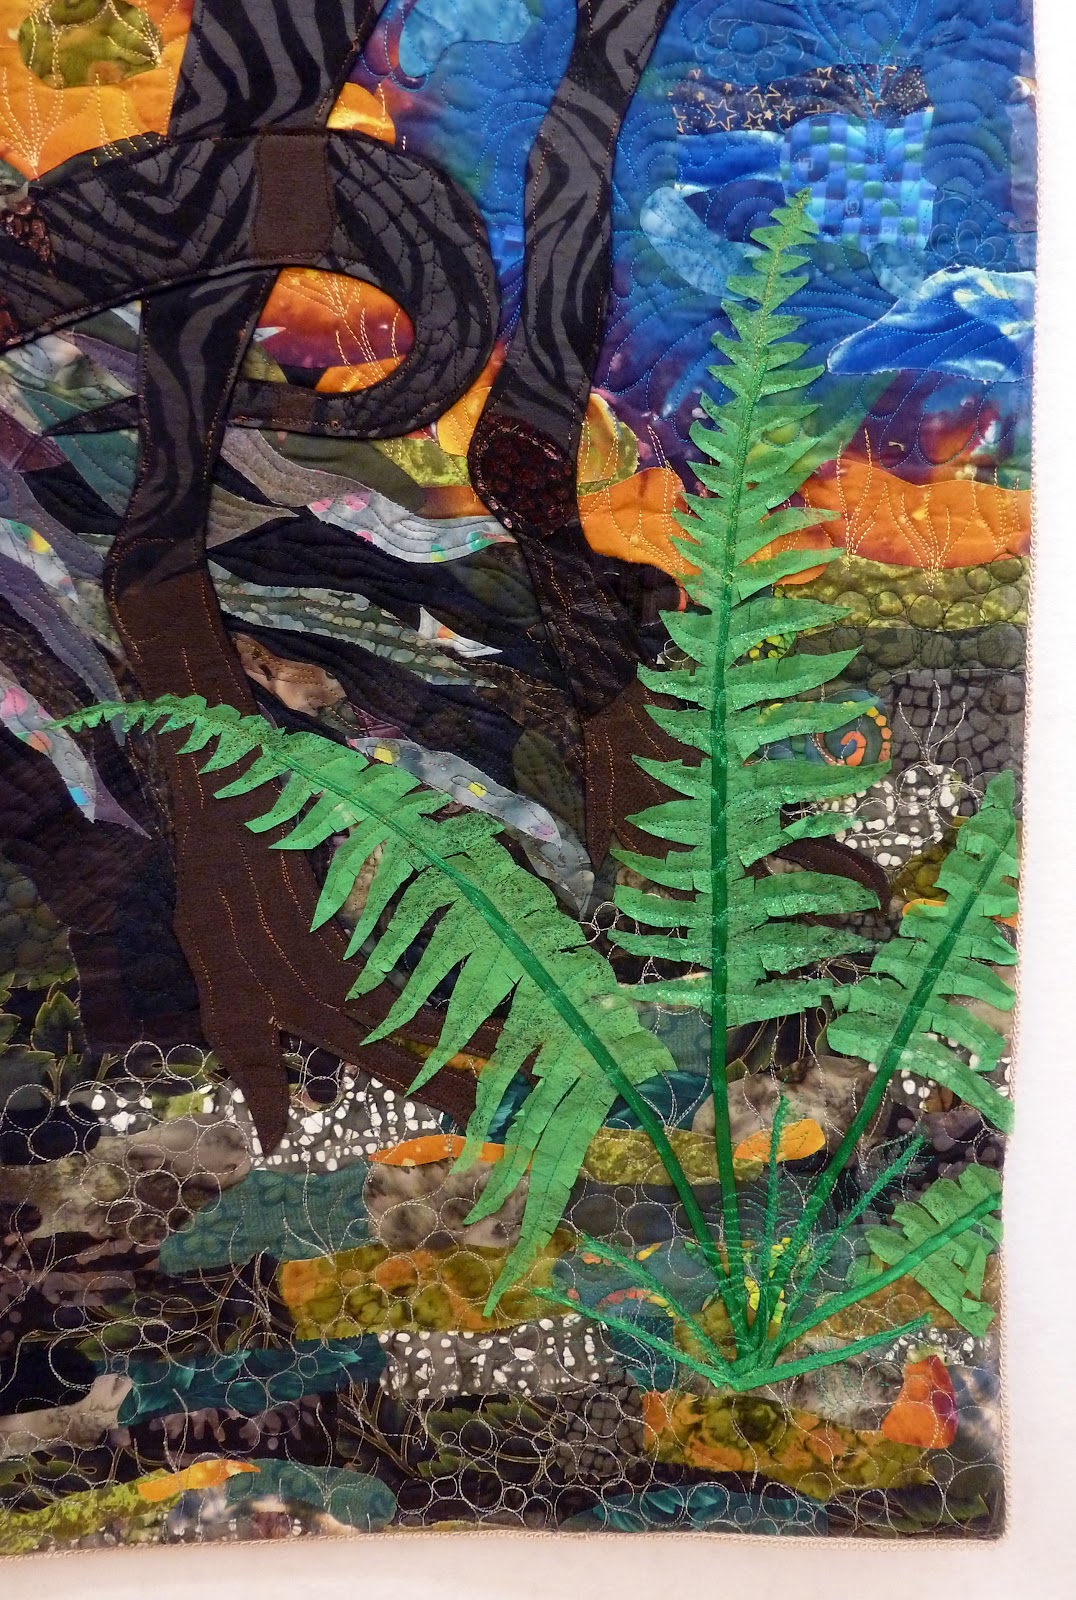
The stems of the fern are made out of ribbon and the leaves of the fern are made out of used dryer sheets.  My mom got that tip in a class from the wonderful Betty Busby, and I've been anxious to try it out ever since then.  I dyed the ferns using acrylic craft paint, basically just mushing them up in my hand with paint (it turned my hands green- use rubber gloves if you have some) and then spreading them out to dry.  I shook a little green glitter on a couple of them.  After they were dry I ironed them, cut out my fern shapes, and tacked them to the quilt with a bit of gluestick.  I quilted down the middle of the ribbon stem and each leaf.   Finally, I snipped along both sides of each leaf and then kind of rumpled them so they'd stand out a bit from the quilt.


Grass and Pebbles

The "grass" is just a few randomly fused down green or brown pieces which have been quilted over.  I think they add visual interest though since the rest of the pieces are primarily horizontal.  The "pebbles" are a few random quartz beads I sewed down.  I originally grabbed them thinking they'd make nice teeth but decided to use them for some more texture in the foreground instead.


Final pics coming soon!

Monday, September 10, 2012

One Thing, One Week link up

Just a quick phone update to say even though I was out of town over the weekend I made my goal for Amy's "One thing, One Week" challenge.

My goal was to get all Seymour's bones sewn down and I'm happy to say I made it!


Thanks for the fun challenge!

Friday, September 7, 2012

Dry Bones!


You guys saw on Wednesday Seymour's body on the back side of his quilt and since then I've been working on his front.  I traced all the bones onto my ivory fabric, stained them with dilute brown india ink, fused them to thick double sided fusible interfacing, and cut them out in large chunks (like foot, or torso).

Since the two quilts may be displayed side by side not just back to back I wanted to make sure that the location of the whole body lined up with the whole skeleton.  I started by hanging the two quilts back to back with the bone side facing out.  Obviously where the body sticks off the side it's easy to see where the bones should go (e.g. for the neck and tail curve).  However, to line up the middle section I pinned through from the back along the edge of the body, legs, tail, and head so I could make sure all the bones fit within those parameters.  Then I pinned up each bone section so make sure everything was fitting correctly.

Next, I cut out each individual bone, pinned it in its proper place, and finally fused them all down.  I'm currently working on sewing them down which is going about as well as you'd expect (read, not well).  I really love the look of the skeleton though with all those bones!!


After finishing the bones, the final step is to work on the foreground of the quilts.  I think the bone side needs some foreground elements so Seymour's skeleton doesn't appear to be floating.  I'm going to do some sage brush and barrel cactus.  However, I'm of two minds about the back side.  I was originally going to put some fun ferns in the foreground, but now I'm not sure where they'd go where they wouldn't be blocking the lake or tree roots  (here's a picture so you'll remember).  What I really don't want is for Seymour to appear to be floating or just stuck on the front.  So what do you guys think?

Important question:  do I need foreground elements on the back (dark body side) and if so where do you think they should be?

Wednesday, September 5, 2012

More from Seymour

Hey everybody!  For anyone keeping track I'm now just a week and a half out from the deadline to finish Seymour.  Unfortunately, I'm going out of town this weekend so time is even shorter.  Luckily, even though my family was all here over the Labor Day weekend, I was able to get quite a bit done on Seymour.  It was actually even more fun working on him than usual;  I've been working on him so long that I'm past the "excited" stage and on to the "slog through please please please won't this quilt ever be done" stage, but my sister an my mom think he's really cool so I was re-invigorated.  They actually helped me out quite a bit and definitely kept me company while I worked.  

This is the "back" side. Even though the front needs to be finished first (for pictures), in order for the bones to be lined up properly, Seymour's body had to be attached to the back first.  I used heavy duty black interfacing and covered it with fabric coated in fusible.  The fabrics I used aren't quilting cottons; they're designed as synthetic leather/snakeskin/halloween costume sparkly type fabrics.  They were pretty light weight and even though they're synthetic they fused fairly well to the interfacing, I just had to use parchment paper between the fabric and the iron.  I actually think they feel more skin-like and leather-like after having been fused to the interfacing since that gives so much body.

After getting the body covered in fabric but before attaching it to the quilt, I quilted some scales onto it.  Unfortunately it was hard to quilt on as my hopping foot wasn't crazy about the relatively sticky fabric, but I think it came out ok.  After quilting it, I sewed it to the surface of the quilt which turned out to be the hardest part of the whole thing.  I couldn't get the dinosaur to fuse or glue to the quilt so I had to pin (through All Those Layers) and then manhandling the thing through the sewing machine was nuts!  Luckily, there were only a few really thick parts (at the edge especially where it's already been bound).


He still needs an eye and probably some teeth, but the next step is the bones!  I love the way he blends into the quilt; this side was supposed to be low contrast and I can't wait to add a bright beady eye that will hopefully jump out at you!

Linking up with WIP Wednesday over at Freshly Pieced!


Tuesday, September 4, 2012

Cyanotypes!

My family was here visiting over the long weekend; my mom was here specifically to do Arts Festival Oklahoma.  It was really really hot (still above 100), but we were glad to see everyone anyway.  Of course even though she was here for business we had to do a fun project together and sun printing was the order of the day.

My mom bought some photographer's formulary sun printing (cyanotype) mix stuff that was supposed to be easy to use.  Of course, unlike the easy kits of the "mix solution A with solution B" type, this one came as a bunch of different powders and vials that had to be ground up, heated, stirred, mixed, cooled, filtered etc., all in low light.  I borrowed beakers, a graduated cylinder, a hot plate, stir bar, thermometer, and mortar and pestle from the lab and the first night we followed the fairly involved instructions to make up the solutions.

The next day we painted the solution onto the PFD fabric in low light and let it dry.  You can sunprint with whatever opaque objects you want (leaves, botanicals, etc.), but we decided to use photograph negatives printed onto transparencies.  My mom had a picture of the historic Old Mill she printed.   It's the oldest building in Ruidoso (built in 1868) and something of a local landmark.  I forgot to take a picture of it before she took it home, unfortunate since it turned out the best of all of them.

The process is theoretically fairly easy, you take the fabric, cover it with the negative or item to print, and put it in the sun.  After letting it expose, you rinse it in water and hydrogen peroxide.  In spite of trying many many different things, I'm not sure we ever got the right balance of chemical concentration, exposure time, and rinse time to really make perfect images, but it was fun anyway.

Here are the negatives taped over the fabric, ignore the picture in the frame underneath, it was just something to tape it all down to.  The next picture shows a couple of my prints rinsing in the sink afterwards.


I chose four different sea-related photographs to make my prints and negatives.  All of them except the jellyfish were taken by my father on our trip to California a couple of years ago.  I took the jellyfish picture.  

On the top left is the original image (in this case a seagull), on the top right is the black and white negative of the image which I printed on the transparency, and on the bottom are two sun prints I made from the negative.  The one on the left is a bit over exposed but is probably one of the better ones I did.  The one on the right is ok, but something splashed all over it before it was dry so it has funny spots.


For the anemone, I made one fabric print from the negative transparency (yielding a positive print) but the anemone looked too washed out.  As a result I printed a transparency with the positive of the image and made two fabric prints from that (seen on the bottom), and I think they turned out better.  


I made two prints from the jellyfish as well (bottom row), and I like the dark blue color better than the more washed out looking one, but it's really hard to see the third jellyfish on the darker print.


The fourth picture I picked was this photo of a seal; unfortunately it didn't really have enough contrast to make a very good print.  I tried two.  The left one was ok, but not great, while the right one was so overexposed you can't even tell it's the seal!


This was a really fun project to play around with.  I'm excited to make some sort of mini-quilt with all of these blocks (each of them is about 6 inches square).  I'd definitely recommend getting the easy mix solution instead of the complicated stuff like we did though.  It's always such fun to try a new surface design/dyeing/printing technique!  

You guys do anything fun over the Labor Day holiday?  Try any fun new fabric techniques?


Monday, August 20, 2012

Ahhhhs.....

While I'm gone I thought I'd share a couple of pictures of the hand project that's been following me around the world the last couple of months.  Inspired by the lovely Tonya over at Hillbilly Handiworks, I decided to kick my English paper piecing up a notch.  She has been presenting an awesome series of English paper pieced blocks (called Ahhs), you guys should totally check it out.

I was getting bored with regular hexies, so I decided to make a block based on her  Ahhh #4 Little Girl's Star and is a bit like Ahhhh #25, Seven Stars.  She mentions that this block was first published in 1950.  You should check out her version, I love the way she fussy cuts the fabric to give a nifty kaleidoscope/snowflake effect.  I went with a more geometrical version.


The whole thing is about 7" across, so each of the pieces is pretty small.  I thought it was going to be finished with this much (I figured I'd hand quilt it to be a mini-mini-quilt), but it just doesn't feel done.  I have it with me on this trip to add some more layers around the outside.  I love the rainbow of colors with the black and white (of course the ugly white basting thread will come out when I remove the papers).  It's been a fun, small thing to carry around and stitch on,

Thursday, August 9, 2012

The Arrival of Seymour

Or rather, finally a plan for his arrival.  All this time, Seymour's just been floating in the back of my mind, but now that his romping fields (er... desert and jungle) are ready, it's time for him to come forward.

When last we left off I'd decided to incorporate trim in the facing of the quilts so that the two sides could be laced together.  In contrast to the test block, I didn't want black trim for the actual pieces, I think it's just too dark.  I got some cream colored trim at JoAnns and tried dyeing half of it with brown ink to darken it up a bit for the back side.  It worked a little, but not very much.  There's obviously more that goes into dying (especially something like a synthetic trim) than soaking it in diluted brown ink!

Anyway, I used the same procedure as I did on the test blocks; glue down trim (with washable glue stick which I put on everything), sew down trim, sew on facing, then flip facing and iron iron iron. Finally, I hand sewed the edge of the facing on the back.  I just finished that part this morning (hooray).

In my original drawings, Seymour took up almost the entirety of the quilt.  But when I was at the Denver Museum of Natural History I was able to view an actual Coelophysis skeleton and it was smaller than I'd thought.  In addition, I really don't like the idea of covering up all my background.  Finally, I don't want the quilts to look like the dinosaur is just stuck on top.

I decided to audition (via photoshop) three different sizes of dinosaur for each side.  The first is the original size I'd planned to do it, the second two are smaller.  I'm currently leaning toward the smallest.  What do you guys think?

Large


Medium


Small

Wednesday, August 8, 2012

Test Block for Seymour

I'm not really sure how much I've shared about my recent thought process for Seymour, so I'm going to back up a ways.  Sorry if it sounds redundant!  My original plan for this quilt was that the front would be the desert side with Seymour's skeleton and the back would be the jungle side with Seymour's body.  From the beginning, the practical aspects of this were daunting:  How was I going to get it quilted so both sides looked right?  How was I going to bind it (I wanted a faced binding) so that it was truly reversible?  How was I ever going to get it lined up right, especially if I decided to overlay the raw-edge applique with tulle?  I finally decided just to start and figured I'd work out the details when I came to the proverbial bridge.

After assembling both backgrounds though, in addition to still having no idea how I'd solve the above problem, I was really in love with both sides and the thought of one side being permanently against a wall made me really gloomy.  I decided the best thing to do, which would have the added benefit of solving all the above dilemmas, was to make two completely separate quilts.  The only remaining problem, therefore, would be how to make them hang as one front-back piece in the show for which I'm making them (where they're supposed to be a front-back thing).

I decided to try to find a way to finish the edges that would enable the quilts to be laced together, back sides together, for display as one piece or unlaced for display as a diptych.  Before trying something rash on my big pieces, I thought I'd make a test block to try it out.  This also enabled me to decide whether I needed tulle over the raw-edge applique.  I wasn't crazy about the idea of tulle, every time I held tulle up over the quilts it blunted the colors in a way I didn't like.  However, I wasn't sure how the edges of the fused pieces would do without something over them.   I therefore made two test blocks, about 11 x 14ish, in the same way I made the backgrounds, namely fusing together random bits of fabric.  I then draped tulle over half of each side and quilted them each separately (with separate batting and backing).  I went to JoAnns and picked up three different types of trim to try and glued sections of each to the quilt top.  I then sewed over the trim so I'd catch it consistently in the same place. Next I pinned on the facing and sewed around again, this time from the back, so that I could sew exactly on top of the same stitches as were used to hold down the trim.  After flipping and ironing, the trim stuck out nicely from the edge on both sides.  Hooray for something working as I'd imagined it would.  Then all that was left was lacing the two sides together.


Various test trims glued down.


Test trims stitched down.

Both sides laced together after facing; from either side it looks just like a normal quilt with a special edge.

Both sides laced together, observe black cord laced through the trim.


I liked the results enough to go for it on the big quilts (although not with black or silver trim), which is what I'm working on now.  Incidentally, I decided I didn't need the tulle, the test blocks quilted just fine with the raw edges.  Since I've now quilted the actual quilts, I can say I don't regret that decision although there were a few loose edges.  Some of them I sewed down with the quilting, and some of them I fused back down where I could.  There are a pieces that are a bit frayed, but I've just concluded that's a consequence of doing raw edge applique.

Linking up with Lee over at Works in Progress Wednesday.

Tuesday, July 31, 2012

I'm Back! (For a moment)

Hi out there all you bloggy friends!  I'm back from my trip to Germany, which was super fun, (and documented in around 800 pictures), and have been quilting madly on Seymour.  Just in the random-aside vein,  this always plays in my mind when I say (or think) "I'm back" or "I'll be right back."  Not sure why, but it's one of those things that's taking up permanent brain space and keeping out more important useful things.


Anyway,  I fused Seymour's background pieces all together on both sides, then assembled the quilt sandwiches.  I used spray baste to adhere the batting to the backing and then fused the top (you may recall the whole thing had fusible on it) to the batting.  This seemed to work fairly well in terms of shifting;  that is, I didn't really have any.  I'm pleased that there were no back puckers or anything.

That didn't mean the quilting went particularly well though.  Some parts were fairly straightforward, while others really made me want to scream.  For instance,  I feel pretty good about the quilting on and around the swamp (on the dark side) and on chimney rock (on the light side), mediocre about the quilting on the background of the dark side, and dreadful about the sky on both sides.

For the foreground of the light side my mom suggested quilting some straight lines (after I had a little mini-meltdown on the phone) so I did that.  I increased the distance between the lines as I came into the foreground (to hopefully give some added perspective), but the lines blend in so much I don't think you can tell.  I also think it probably needs more quilting in that region, but so much will be covered by Seymour that I'm going to wait to do any more quilting till his skeleton is on there.

I did the (seemingly)-requisite ripping as well, once when the tension was way off and I didn't realize it until I'd quilted a large section, and once when the extra backing got accidentally flipped around the edge (ACK).  Also, I did all the quilting on the singer 201 which has a blessedly large amount of space under the harp compared to my baby Janome, but makes extra stitches after I've picked up my foot/stopped my hands.  I have lovely little knots all over the top of my quilting.  *sigh*


However, squaring them up and standing back (way back) made me feel better, as I'm still liking the overall impact.  The next step is to put on the trim and facing so the two sides can be laced together (I'll post on that later this week).  My goal is to finish the trim/facing this week, so wish me luck.  I'm headed to my family home in southern New Mexico on Friday for a family reunion in honor of my Grandfather's 85th birthday.  Should be fun, especially because my favorite Anna Banana will be there.  She has grown significantly (to judge from the pictures) and has apparently acquired many new skills since I last saw her.

Hope everyone is doing well out in blogland (and real-land too!)