Pages

Wednesday, July 6, 2011

QNM Small Projects

I'm a long-term subscriber and avid reader of Quilter's Newsletter Magazine;  it's a really great compendium of quilting news, new techniques, artist profiles, fabulous quilt photos, and a few patterns.  One of my favorite unofficial regular features in the magazine is what I always think of as the "fun-small-project-of-the-month."  They almost always publish a small project showcasing some technique that's new or fun or different.  I love to try these since you can test something out without committing to a giant undertaking.  In addition, although I like making large involved quilts, I'm also a sucker for the make-it-in-a-weekend type projects.

The first project-of-the-month I tried was a thread-painted portrait of my mom.  It didn't turn out too well- she said something uncomplimentary and I've teased her about it ever since.  In any case, I'm not showing it here.

However, here are two more successful projects which came from QNMs small-project-of-the-month section.  The goal of the first one was to make a "village-scape" using only a few little shapes.  The idea is that you cut out a bunch of fusible-web lined squares and rectangles and L-shapes and small triangles, and then lay them all out so they look like a small European village on a mountainside.  When I saw this project we'd just gotten back from a vacation in Spain where we saw several of these villages, so my Mom and I thought we'd try it.  We even incorporated a couple of photo transfers from our trip.  My mom made one in black and white, and I made mine in sort of beige tones.  It's one of the only muted color schemes I've ever used, and even then I couldn't resist adding the pops of color in the flower baskets.  After lining up all the pieces you just fuse them down, cover with tulle and quilt over it.  Easy-peasy for a pretty cute effect.


The second small project involved weaving pieces of fabric like on those old woven valentines we used to make out of red and white construction paper.  My sister, our cousin, and I each made one of these mini wall hangings (they're about 16 x 18 inches or so).  I don't quite remember all the instructions, I think we cut out and wove the fabric and then fused it down on fusible interfacing or something.  Anyway, it was quite easy and gave a fun abstract landscape sort of look.  I accented mine with fabric flowers/buttons.


Monday, July 4, 2011

Patriotic Lone Stars: Part II

Having decided to make Mike a real lone star quilt, I set about trying to figure out how to do it.  I decided to make it a largeish wall quilt so he could hang it in his office.  In retrospect, I'm quite glad I didn't decide to make it bigger because even with the easy techniques, it was a lot of points to match up for this precision-challenged girl.  It makes me even more in awe of the precision piecing on display at the big quilt shows. In the end, I think mine turned out pretty nice, the saddest part was that while quilting it (on the long arm), I got a bunch in the backing fabric, so there's forever an ugly ripple on the back.  That's a mistake I hope I won't have to make twice.

Anyhow, Jan Krentz has a great book for traditional fancy lone stars, I initially got it from interlibrary loan, and then decided to just buy it (Lone-Star Quilts & Beyond).  I used her strip piecing method to make the star points, that definitely made it easier, and I encourage anyone considering a traditional lone star to use that method.

After piecing the star points, I took these (out-of-focus-cell-phone) pictures to see which arrangement my quilting buddies liked best.


The third one won out, so I pieced the rest using sparkly white background fabric and some USMC accent fabric in the borders.  I designed four patriotic applique/embroidery patterns which I sewed onto the white background blocks by hand before piecing them into the quilt.  Mike's a Marine, so I did my best to capture the Marine Corps emblem in one of them.


For the label, I printed (on fabric) a picture of Mike at a display of Christmas lights- I liked the big flag and it seemed to fit with the theme for this quilt.  


Here's the final quilt.

Proud to be an American, 2009 49"x 49"


I think Mike liked it; I gave it to him for Christmas in 2009.  I certainly like the colors and it was fun to do a traditional pattern.  He hung it in his office until he retired, and now it lives in our entryway.


Saturday, July 2, 2011

Patriotic Lone Stars: Part I

In honor of the upcoming holiday, I thought I'd share these red-white-and-blue Lone Star quilts I made.  Although I'm not usually a traditional quilter, I am actually quite fond of the lone star pattern.  I was initially scared off by all of the diamond shapes, which I always assumed had to be pieced using set-in Y-seams.  As it turns out, there are easier ways, but I'll come to that tomorrow.

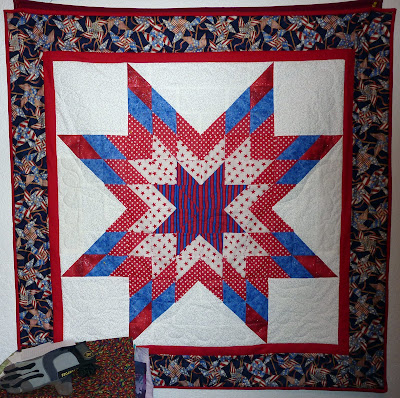
Three or four years ago (in our very early quilting days), my mom came across a pattern somewhere for a "wannabe" lone star wall-hanging made of half-square triangles.  Instead of having diamonds, the lone star is made up of little parallelograms which are much easier to piece and approximate diamonds from afar.


We had a lot of fun laying out the half square triangles on the top bunk-bed at my mom's house- It was tricky to make sure we were sewing the right sides together-one wrong seam and the pattern was totally awry.  I've always loved that pinwheel print in the quilt border, I wish I had some more of it; alas all that's left is a few tiny pieces in the scrap bin.  Anyway, the main lesson I learned from this quilt was to watch my print choices; the wretchedness of those mis-matched center stripes still gives me a headache.  Alas, making the easy version didn't assuage my desire to make a real lone star.  This quilt hangs now in my quilting room where it mainly serves as a pin-board on which I hang other works-in-progress.

Sorry for the work gloves and pile of fabric in the picture.  I'd take a new photo, but three other projects are currently pinned haphazardly on top of this one.  As an aside, the blog name "I'm working on a project" is, as Professor Dumbledore once said, "optimistic to the point of foolishness."  I've never worked a single project in my whole life and in common with most quilters, the UFOs in my quilting room outnumber the finished work.

Back on the subject, in 2009 I decided to make a quilt for Mike; when I asked him what kind of quilt he wanted he pointed at the wannabe lone star and said he wanted one like this one.  I figured it would be the perfect occasion to try out the real thing.  So- tomorrow, the real lone star.

Tuesday, June 28, 2011

The Pink Elephant Show!

So I'm one of those fidgety people who's pretty much always doing something.  If I have a project in hand, this tendency looks like oh-my-aren't-you-productive-and-dedicated, if I don't have a project it looks like please-for-goodness-sakes-won't-you-sit-still!  As a result, I usually try to have some sort of hand project with me for those sitting around times.

As a kid, I made those little woven potholders, and then I did cross-stitch and some other embroidery.  More recently though I've been trying other things.  My mom is a fabulous knitter, and taught my sister and I to knit.  However, in spite of having successfully made a knitted, felted Easter basket and a single sock, I feel compelled to address the importance of verb tense.  I have knitted in the past.  I do not knit in the present, I am unlikely to knit in the future.  I finally had to conclude that there are some crafty skills with which I just don't mesh well.  It's pretty sad too, because there are so many beautiful knitted things out there.  Alas,  I was so upset by knitting that my mom had to finish my other sock.

Mom, do you hear me?  THANK YOU for the sock.  I am NOT a knitter!

In contrast, I quite enjoy crocheting.  I've been doing some other hand projects, like English paper piecing and some hand quilting on a small whole cloth quilt, but today I'm going to share some cute crocheted animals. Amigurumi are all over the web; I jumped onto the train way late, but they're so adorable I couldn't resist making some.  I have Ana Paula Rimoli's book, "Amigurumi World: Seriously Cute Crochet" which has tons of cute little amigurumi animals and fruit.  The best thing about these is that they're super easy to crochet, so they're great for when you don't have the mental focus for super-duper concentration.  I made these two a couple of months ago out of yarn I just had sitting around.

Here's Pokey the pink elephant:


.


One of my favorite things about amigurumi and especially the pattern in the book are the little details and the proportions that contribute so much to their expressions and feel.  Pokey's toenails and skirt get me excited every time I see them!


And here's Ruff the spotted dog:


I love his big smile and his sentimental spotted eye.

The two of them love to play together and bounce about, but I think I'm about to give them away as presents to some small children I know.  Anyway, these are super-easy and adorable. Most are built on similar foundations, and only require the most basic of crochet skills.


Thursday, June 23, 2011

Tackling the UFOs!

So over at Fashioned by Meg they're doing a Finish it Up Challenge for summer of 2011.  Sounds like the plan for me!

I have counted up my UFOs and here is the current list of quilt projects things that have been started and not finished:

1. Purple Medallion Quilt:  Status- top pieced, needs to have faux trapunto and machine quilting.
2. Hawaiian Applique Quilt: Status-top pieced, sandwich made, some quilting done.  Needs to have Zendoodling quilting done and finished.
3. Dog Portraits: Status- two dogs thread painted, need to finish thread painting, assembly, and quilting.
4. Nativity Mosaic Quilt: Status- Mary and Joseph are mosaic-ed, everyone else needs to be tiled in and finished.
5. Visions of God Group Church Quilt: Status- All the blocks but 3 are sitting in a pile on my desk.  I need to get  three more blocks and then assemble/quilt it.
6. Large S Quilt: Status-Top is finished, needs to be blocked and quilted.
7. Small Caryl Fallert Blocks: Status-Miscellaneous blocks need to be quilted/finished and donated.
8. Grandmother's Flower Garden Project: Status-Not even sure what this is going to be, but I have been piecing a bunch of grandmother's flower garden blocks and need to do something with them.
9. Miniature Whole Cloth Quilt: Status-about 2/3ds finished, need to find some ribbon to quilt with and maybe some perl cotton.

Eek!  It seems like these are a lot of pretty big unfinished quilting projects and there may be more if I actually went through all my piles!  Certainly there are other ongoing non-quilt projects I'm involved in but it doesn't seem fair to list them too.  I'm going to be trying work hard on them this summer.  And while I could never promise not to start any new projects, I'm promising myself not to start any new BIG projects.  Keep your fingers crossed that I make some progress!

Here's a teaser picture from number 3 above.

Wednesday, June 22, 2011

Small S Quilt

My mom and I went to quilt camp for the second time this summer.  Quilt camp is the most amazing event ever, and I wish we could go each year.  Alas, it is pretty pricey, so every couple of years is about all we can manage.  Anyway, quilt camp is actually called Empty Spools Seminars and it's held at Asilomar State Park and conference grounds on the Monterey peninsula in CA.  The setting is pretty awesome, it's forested and full of wildlife AND on the ocean (no sand for this girl though).  You stay there and eat there, and attend a five day class with a really famous fabulous quilt artist of your choice.  Seriously, like summer camp for the quilt set.

This year we took a class with Caryl Bryer Fallert; anyone who is not familiar with her fantastic quilts should go look immediately and covet them.  Of course, they especially appeal to me with my urgent desire to use all-bright-colors-all-the-time-right-now!!!  Anyway, the class was super-duper and we learned a million fabulous things I'll talk about some other day.  At the beginning of the class we did a bunch of cool exercises (more on them also some other day), but toward the end of the class, we started designing our own large projects.

One of the exercises was to do something like 60 (no joke) small drawings/doodles inspired by magazine pictures, our imaginations, the view out the window, whatever.  We then picked a favorite to start designing our big project.  My favorite doodle was inspired by this "S" paragraph starting initial from a 12th century German manuscript.   We found it in this fabulous old book of copyright-free images my mom got from my grandpa.  I think he had it from his stagecraft days.


I designed my large S quilt based on it; I'll have a series of posts about that later as it's very much still in progress.  However, recently, a reader challenge in Quilting Arts magazine caught my eye.  The challenge was to design an 8.5 x 11 quilt incorporating text into the quilt in some way.  I decided to make a simplified version of my large S-quilt and enter my first-ever challenge!

Here's my pattern, I pieced the whole thing using Caryl Bryer Fallert's appli-piecing method which is very easy.


Sadly, for the second time I messed up and forgot to trace my pattern onto the templates in reverse, so I had to re-engineer as I went so the S wouldn't be backwards. Then I thread stitched the foot on backwards!  It was really wretched ripping out all those dense stitches.  I inked some of my favorite S-words in the border with Pigma pens and did a little shadowing with colored pencil.  For the fiery word the dragon/serpent is spitting, I used orange sharpie which bled a little bit more than I would have liked but I guess gives an interesting effect.  I also used a green sharpie on the green fabric to ink another S-word but it bled so much you can't even tell.  I quilted it on my Janome and put another S-word in the quilting.  Finally, I used seed beads for the big words at the bottom. I also did a faux piped border to give the little accent color. Special shout-out to Cheryl (yay Cheryl!!) who was kind enough to try to help me over the phone when I called her out of the blue for panicked help with the piping.  It turned out to be pretty easy (next time I'll try real piping) and I think the purple/pink gradation in the border nicely picks up the purple/pink from the serpent.  Keep your fingers crossed that it gets accepted into the magazine.  What are your favorite S-words?


Update: Sadly my little S quilt wasn't a finalist for the Quilting Arts contest, but I'll hang it up just the same!

S is for... #1, 2011 8.5" x 11"


Monday, June 20, 2011

Thread Catcher

Back in February I saw this cute thread catcher (I think it's actually called a Weighted Pincushion Organizer) on the Quilt Show website.  The pattern is from Sew Mama Sew (a great site for anyone who hasn't found it yet http://www.sewmamasew.com/).  I thought I'd make a couple of them, the pink one is mine, and I gave the green and yellow one to my mom for Valentine's Day.  It's pretty cute- the top is (obviously) a pin cushion, and the thread catcher is removable so you can stand it up somewhere else if you need to.  It also has a couple of little pockets built in to store your favorite accessories- for me the go-to things are the blue seam ripper and my little thread snips.  It was a quick and fun project- a great way to show off some brightly colored prints (and also, my refrigerator apparently).