Pages

Wednesday, January 16, 2013

WIP Wednesday: Memory Quilt

I've made a fair amount of progress on my Japanese Sister Tree Quilt this week, but today I wanted to share a finish that's been in my WIP pile for a while!

It's the memory quilt for my dear friend Linda who was our church organist and choir director for 24 years.  The pattern is based on Amy Smart's lovely chain linked design, but my blocks were a different size so I just sort of worked out the math.  I mentioned previously that members of our church parish signed blocks for her and left messages/pictures, so those are in all the centers.

I did a zig-zag binding, which was easy-ish, but I got the edges stretched out a bit.  When it was all finished, I washed it, and was upset to see that some of the "permanent" markers had run a bit.  I heat-set all the blocks, and tested several of the markers before having people use them on the quilt so I thought they'd be ok.  Unfortunately, I didn't test every single color, and the running was definitely a color-specific phenomenon (the teal was the absolute worst!).  I'm really sad about this actually, but I think she can still read almost all of the blocks.  It did crinkle up nicely after washing, and it's pretty soft and cuddly (in contrast to most of my quilts which are so filled with quilting and fusible that they're fairly stiff).

I still miss Linda a ton, and hopefully this will remind her how much she matters to us!


Incidentally, it was my first ever pieced back (i.e. not solid) and it was fun to put some interesting things back there. 


And finally, some of the pictures and folded paper flowers (printed on copies of her favorite hymns) we made as centerpieces for the celebration on her last day at church.

Linking up with Lee as ever!

Monday, January 14, 2013

Ruby Star Wrapping Round-Up

I know everyone is probably totally done with thinking about holidays and presents, but I wanted to jump in with one last holiday themed post.

I was lucky enough to win a copy of the great Ruby Star Wrapping book from Sew Allegorical during one of her sweet giveaways.  She kindly shipped it very fast so I got it in time to use many of its ideas for my Christmas wrapping.

I've always liked to use fun or non-traditional wrapping gear; I've used old national geographic maps, old conference posters, calendar pages, etc. but hadn't had any ideas for this year.  After thumbing through the book I decided to do a bunch of fabric bags so that I can use them all again next year.

I made several easy gift card pouches, since Mike always gives gift cards or cash to his girls, and I made about six or so drawstring pouches of all different sizes.  In the end, the thing that wound up being the easiest was a bunch of the fold over baggies.  These are like plastic lunch baggies, but out of fabric.  In the book they're small, sort of sandwich and snack sized, but it worked great to make them in a bunch of different sizes, some as big as pillowcases.  In cases where the present was smaller, I just wrapped the extra fabric around.  Tie it with a ribbon and ready-to-go!

Fairly quick and easy, and definitely less paper and tape waste.  There are tons of great ideas for all different non-traditional wrapping materials, I just went with fabric because (duh) that's what I have laying around.  It was actually a great chance to use up a bunch of fun Christmas fabric acquired from who knows where that I probably wouldn't have ever put in a quilt.

It's definitely a book worth looking at if you're craving ideas for alternative wrapping materials.  Thanks so much Al!


Friday, January 11, 2013

Japanese Sister Tree Quilt

I'm fairly certain that's not actually going to be the name of this quilt, but that's what I'm calling it now.  It's one of two art quilts i'm working on now, and finishing the top is my January goal for A Lovely Year of Finishes (hosted by Fiber of All Sorts).

I'm calling it the Japanese Sister Tree Quilt, because it's an offshoot (or sister project) to a quilt my mother is working on based on a picture of a tree she took in Japan.  Her quilt is beautiful and complicated and has an extensive backstory, which someday I will share here (hopefully with finished pictures).  For now, I'll just mention that the background of her quilt is based on a large graphic drawing she did in photoshop (of the aforementioned tree) and then printed out on fabric.  She accidentally printed one of the pieces twice so sent it home with me.  Along with another test print, this extra piece became the foundation for my quilt.

I'd been wanting to try out Libby Lehman's organza applique technique I saw in her video on The Quilt Show.  I quickly sewed up this quilt top (it's about 24 x 24) to use as a canvas for the organza.  I didn't have any tear away stabilizer, so I just fused shapeflex 101 (one of my favorite interfacings) to the whole quilt to add stability for the applique.


Sadly, only after I did that step did I hang up the top and notice that my three small blocks were not evenly spaced under the one large block.  I debated leaving it, but every time I looked at it, it bugged me.  So I ripped off the interfacing (not fun), picked out all the stitching, and fixed it as best as I could.  Unfortunately, the skinny border around the three small blocks is gold apparel fabric, and it completely unraveled when I tried to rip out and re-sew (not sure why it didn't occur to me to back that with interfacing).

After much difficulty, I got it all re-assembled (more or less) and began my planning for the organza.  I decided my first (and most involved layer) would be the tree branches, and then I'd go back in with green and pink for the leaves and cherry blossoms.  I ironed freezer paper onto the whole quilt top, except where my center block, was and sketched my branches, going out from the center block.  I then peeled off the freezer paper, adhered organza to the back of it, and then ironed it back down on the quilt top.

I took this before fixing the three small blocks.

This is a bit different from Libby's technique- she cuts her design out of freezer paper then stitches around it (through the organza), but my little branches were so skinny, I didn't think there'd be enough support to keep it all steady.  Having one large piece of freezer paper adhered down had the added benefit of keeping everything from stretching weirdly.  Incidentally, where there was organza adhered to the freezer paper, it wouldn't stick back to the quilt top (so I used a couple of pins) put there were several large areas where there weren't any branches (so no organza) in which the freezer paper stuck to the quilt top nicely.

I wasn't sure how the whole process would work out, so I started with a tiny section, sewing in a matching thread color over the freezer paper/organza/quilt top along the outline of a couple of branches.  I then tore off the freezer paper, cut away the excess organza, and bobbin quilted using some perle cotton (not sure which number, but it's fairly thick).  The bobbin quilting was quite easy, because I was able to just follow the previous line of stitching.  I love the varied line that comes from not threading the perle cotton through the bobbin tension; in some places it's very knobbly and in others straight and smooth.  It might be terrible if you were trying to go around a soft smooth shape, but I think the inconsistency here contributes a lot to the texture, and makes it look like tree bark.

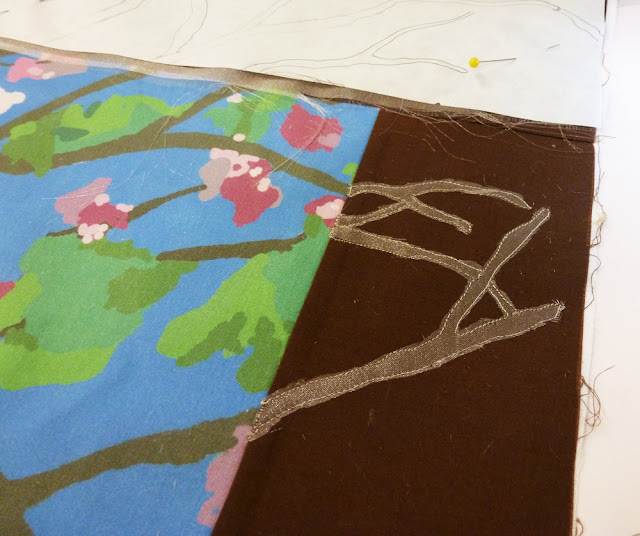


The only thing I wasn't happy with was the frayed edges of the organza which were still visible.  If I'd couched on something thicker they might have been obscured, but my branches are pretty small and I didn't want a thicker edge.  I'd read that you can use a woodburning tool/soldering iron to cut and seal organza, so I tried that and it worked great!  I'm so thrilled to get rid of those nasty ravely edges.  Unfortunately, I didn't remember to snap a picture, but I'll show one next time. Now onto the million other branches!

I'm linking up with the inspiring art quilt party Off the Wall Friday over at Nina-Marie's.  You guys should check it out!

Wednesday, January 9, 2013

WIP Wednesday: Crochet Flower Blocks

Thanks to the holidays and traveling it's been a while since I wrote a WIP: Wednesday post, but I'm getting back in the routine for the new year.

Over the last few weeks I had one major finish, the memory quilt for my good friend Linda.  I'll share pictures of it next week, I haven't had a chance to give it to her yet, so I want to do that before a final post.

While on holiday at my mom's, I made a lot of progress on designing my next art quilt, currently going by the name text messages.  It's actually inspired by illuminated manuscripts, specifically books of hours or prayer books from medieval Europe.  I think it's going to be pretty cool, but my mom and I are thinking about submitting a magazine article that features some of the techniques I'm using in it, so no pictures of it now either.

Instead, I thought I'd share pictures today of another long-term project on which I made significant progress in the last couple of weeks: my crochet sampler blocks.  Last year for Christmas my mom gave me this fun granny square book.  I started off crocheting them directly from the patterns in the book, and now I've done enough of them that I seem to be able to change them up a bit without too many dire consequences.  I love crocheting in the car, it's easier than paper piecing for me anyway, and I finally have enough of these that I thought I'd show them.  Sometime in November I thought surely I had enough blocks, but when I counted them up, I had barely a quarter of what I need.  Now I'm about halfway, thanks to many hours of crochet on the long drive to New Mexico.

Here's just a sampling of some of my finished ones, and below that are three of my current favorites.  I'm using 100% cotton yarn in just about every color I can find.  So far I really love the way they're turning out, although every single one will need extensive blocking, and I'm not sure how they'll wind up going together.  I guess we'll see!


I'm linking up with Lee, and hope you guys are all also making good projects on your WIPs!

Monday, January 7, 2013

Happy Monday and Plans for the New Year

I'm so very very late doing this, but I still want to share some of my plans and goals for 2013, as much to give myself a record as anything else.

First, a few thoughts on 2012.  It was a pretty good year for me, although by the end of the year I always feel ready to start something new.  The last couple of months (really since I finished Seymour) were filled with fun crafty sewing, but not with anything that I felt challenged my creative juices.  I just got Seymour back from the gallery show in Albuquerque and it was wonderful to have him back in my possession.  I feel really proud of that piece and like the feelings I got from working on it.  Doing more work like that is one of my goals for 2013.  In the last week or so I have finished up some of the things that were part of my 2012 (more posts about those in the coming weeks) so that while I still have UFOs, I feel like I have time and brain space for more creative design work going forward.

Major Goals for 2013

1.  I'm setting a goal for myself of creating four new art quilts this year.  Maybe I can finish more, maybe fewer, but that's my goal.

2.  It was really wonderful to finish Rejoice, Rejoice, not just because I love it, but because it was a UFO for so long!  Therefore, my second goal is to finish the last major UFO I have languishing in my sewing room: the dog portraits.  It's actually the only thing left on my my very first UFO list on this blog.

Current Projects in Progress/Planned

To add a bit of detail, here are the projects I have currently going or planned on which I want to make progress/finish this year:

In progress
Dog Portraits
Text Messages
Japanese Tree Sister Quilt
Crochet Sampler Afghan
Ahhhh EPP Star
Cyanotype Blocks Quilt

Planned
Gloria Loughman class quilt  (we're going to quilt camp at Asilomar again, YAY!)
Skirt from denim I bought a while back
Christmas centerpiece with vintage linen (I wanted to do that for this past Christmas but it didn't happen)

I know there are more I already have planned an in my UFO bin, and more that will get slotted in as time is available, but here's where I'm starting.

I've also decided to participate in A Lovely Year of Finishes hosted by Fiber of All Sorts and Bitter Sweet Designs

My goal for the month of January is to finish the top of the Japanese Tree Sister Quilt.  Hopefully I'll have time to do a full post on it soon, but here's a quick picture of where I am so far (since joining a linky with a picture free post is terribly boring).


Wishing you all a productive 2013!


Friday, January 4, 2013

Salamander #5

Mike and I have arrived home after a lovely holiday week at my family's place in New Mexico.  It was, as usual, fairly chaotic; between me, my sister, and my parents we had nine dogs and a baby, so there was lots of hullabaloo.  Fortunately, I did get to spend some good quality time with all of my family.

In common with most everybody else, I'm now trying to get back in the swing of things.  I have a bunch of thoughts and plans for the new year which I'll probably share next week but I wanted to share a bit of quilty goodness from the break.  Hopefully soon I'll have some more of my work to show, but I have a few quilts of my mom's I'd like to share first.

A long time ago, maybe two or three years now, my mom experimented with creating designs using a bleach pen on black fabric.  She made this awesome rooster; basically you take black fabric and draw on it using the bleach pen (there may be a stop step but I'm not sure) and then over dye it with fabric reactive dyes.  I think he's so cool, and the chicken wire quilting in the background really fits so well!

Cock-A-Doodle Doo, Detail, Vicki Conley 2009.  Photo c. Doug Conley

Cock-A-Doodle Doo, Detail, Vicki Conley 2009.  Photo c. Doug Conley

Cock-A-Doodle Doo,Vicki Conley 2009.  Photo c. Doug Conley

Around that time, my mom helped my sister do a lizard panel in the same way.  My brother-in-law really likes lizards, and my sister had been collecting lizard fabrics for a long time.  She pieced some blocks using these fabrics and put them around the panel.  Sadly, after that the quilt top sat around for a long time (until about two months ago) when my mom offered to quilt it for Becky since she doesn't have much time lately.

My mom quilted bricks in the background using metallic thread so it looks like the lizard is on a wall.  She also quilted some black-on-black lizards in the background.  It's called Salamander No. 5 which was, I believe, a nickname of my brother-in-law's.  He loved it, and I think it turned out super fun.  So cool to have it finally finished!

Salamander No. 5, Becky Buckner and Vicki Conley 2012.  Photo c. Doug Conley


Salamander No. 5, Detail, Becky Buckner and Vicki Conley 2012.  Terrible iPhone photo NOT to be attributed to my dad.

I'm going to add this to Off the Wall Friday, the fabulous art quilt link party over at Nina Marie's this week!


Monday, December 31, 2012

On the Seventh Day of Christmas.....Ornaments!

Seven swans a swimming.....  Have you guys ever noticed how many birds are in that song?  There are giant hordes of birds that come every fall and nest on the parking garage at work on which I park and they continually cover my car with bird poop.  Yuck.  Walking out in the dusky evening after work is like entering an Alfred Hitchcock movie or something.

Anyway,  not a big fan of birds.

But what I actually wanted to talk about today was the fun Christmas ornaments I made this year! I've decided I'm going to do an annual ornament for Anna Banana,  and this year I was inspired by Mollie over at Wild Olive.  Back in the fall she presented this cute, simple paint and embroidery combo, and I decided to use the approach for Anna's ornament.  I made and ironed down a freezer paper stencil of the letter A then painted it in with watered down acrylic paint.  Mine doesn't look as "washed" as hers, I think I'd have done better using watercolors, but after bit of embroidery and assembly with some trim: POW! Cute Christmas ornament!


For Mike this year I decided to go BMW themed, as I always try to pick something relevant to his current interests.  Past years have included the Wi-fi/Ampitheater ornament, the Evernote ornament, and the Sons of Anarchy ornament.   He got his BMW motorcycle in March or April of this year and was very proud to have ridden it ~22,000 miles by mid-October, so I thought the BMW logo would be a good choice for this year's ornament.  Unfortunately, I don't have a very large selection of silver fabric (I think a solid silver would have been better) and have still not mastered the art of sewing a circle, so there are pointy-outy-bits, but that's ok.


Hope any birds in your Christmas celebrations refrain from pooping on you!