Pages

Monday, September 19, 2011

Patty the Piglet

Another fun crochet amigurumi for you guys!  I swear I really am a quilter, but these little projects just get done so quickly I can't help but post them.  I promise, progress on big quilts is ongoing.

I made this cute little pig for Mike's granddaughter's third birthday.  The theme of her party was Olivia, but I couldn't find an actual Olivia crochet pattern.  Upon opening the package, she swirled the piglet around and around by its tail and then threw her in the air.  The piglet is really pretty round and tosses well.  The pattern was very simple and found here.  I decided I'd rather have a skirt than wings, so I just added one instead.  For anyone keeping track, this is the same skein of pink yarn as Pokey the Pink Elephant was made from.  I also made a small pink bunny I haven't yet blogged about, as well as Patty the Piglet.  There's still enough of this yarn for one more animal at least, then maybe I'll switch to a different color.


My favorite part about the little piglet is her curly tail!


I tossed the piglet to Mike and he tried to show Missy.  Alas, Missy was quite aggravated by the piglet and growled at it alarmingly.  One final note,  I'm so excited, we're going to the fair tonight and there are little baby piglets there that were just born last Thursday!  I'm so excited to see them, although Mike thinks I'm nuts.

What's you guys favorite fair activity?

Friday, September 16, 2011

H is for Hippo

This is the last post on the small things I made for my mom's recent birthday.  My mom has collected hippos for a long time now, and they are usually pretty adorable.  Apparently in real life they are quite mean, but none of ours are.  When I made the crocheted amigurumi elephant and dog, Mom asked if there was a hippo.

There was not a hippo in the book I had, so I scoured the internet for a tutorial or a pattern.  Sadly, in spite of the wealth of little amigurumi, I had little luck finding a hippo pattern.  I finally stumbled upon this adorable purple hippo and the lady said she had made it using Vanna White's Easy Crochet Critters book.  I got it from Hobby Lobby and crocheted away.  As with most amigurumi, the patterns are very easy and it went together quickly.

Bizarre side note:  when I started looking for a crocheted hippo pattern, I swear I could not find anything online.  Then, a minute ago in an effort to find the original cute purple hippo that inspired me to get the Vanna White book, I google "amigurumi hippo" and  tons of cute hippos and several patterns pop up right away.  I have no idea what I was doing before but weird.  Sadly, I can't even find the really cute one I saw before!

Anyway, I made my hippo with green lightly variegated yarn and gave her a pink neck scarf.


I really like making these little guys.  They're all easy to crochet, the patterns are simple, and the results are adorable.  They're great for a take-along project.  Next up- a little alligator guy!

Hope you enjoy!

Wednesday, September 14, 2011

State Fair Roundup

I've entered some of my quilts in quilt shows before (when I can remember the deadlines), and it's always fun to see them hanging up with the really phenomenal work that is usually present.  This year I decided to enter a quilt in the state fair (which always reminds me of Charlotte and Wilbur).  They give out ribbons up to 10th place in each category, and even though they use fairly standard ribbons, they're usually bright fun colors.

When I went online to register, I realized I'd missed the deadline so had to pay a late fee.  When I looked closer though, I realized it was a single ten dollar fee for as many items as you wanted to enter and the only limit was that you could only enter one item per category and the items had to be finished this year.  The state fair has LOTS of categories, so I figured why not enter several things!

Here's what I entered; keep your fingers crossed that I get at least a couple of fun colored ribbons!

In Quilts: Machine Quilted
Starflower


In Embroidery: Mixed Types (I originally had it in Custom Needlepoint but the lady at the fair told me it wasn't needlepoint at all and helped me find a different category.  I was confused apparently)
Starflower 2


In Crochet: Animals/amigurumi


 In Quilts: Crib
Hawaiian Applique (yes, I know it's not really a crib quilt, but it's about that size, and you're really not supposed to put quilts in cribs anyway these days)
In Quilts: Miniature


And, finally
In Quilts: Wall Hangings


Wish me luck!

What's your feeling on entering quilts or projects in contests?  Have you won any fun ribbons?

Monday, September 12, 2011

Starflower 2

I always like to have hand projects to do in the car, and at various times have tried all sorts of things;  knitting, crocheting, cross stitch, needlework/embroidery, hexies, you name it.  I think I've just about concluded that the best thing for me in the car is really simple crochet.  I started a complicated doily type thing a while back; it's actually a UFO that didn't make my list, but its pattern was too complicated for me to focus on while simultaneously chatting to the driver or listening to an audiobook.   The hexies are pretty simple too, but I don't want to make any more of them until I know what I'm going to do with them.

Anyhow, a couple months back I decided to try hand quilting.  I made myself a quilt sandwich with black sparkly fabric on one side and white sparkly fabric on the other side and sketched out a star with rays radiating out.  My idea was to fill each ray with a different hand quilting pattern.  I also thought that it could be double sided; some colors of thread would show up better on the white and others would show up better on the black.

I struggled along for a while; I don't really know how to hand quilt, so I looked up some online resources which were pretty helpful.  Sadly I don't remember where I found them!  The whole process was slow though and the sparkle in the black fabric combined with the skinny quilting thread meant that the stitches weren't showing up as well as I wanted.

When my mom suggested I use embroidery thread, I jumped at the idea.  The double stranded (or more) thread showed up much better, and I could use larger stitches.  I did several rays using the embroidery floss with just a simple running stitch until one day I stumbled across Molly's embroidery stitch instructions on Wild Olive.  I've read her fabulous blog for a long time (you guys should totally check it out) but it never occurred to me that I could do some of the fun stitches since my mind was still on "quilt" not "embroidery."

In the end, the project turned out to be a mix of various types of stitching with lots of colors (my favorite kind).  I had intended to work on it slowly in the car but found that my stitches were neater when I worked on it while stationary.  Then a couple of weeks ago I decided to enter it into the State Fair which starts this week, so I went ahead and finished it up.

Starflower 2, 16" x 16" 2011, Shannon Conley


Here are some close-ups of some of the sections, sorry about the weird shadows in some of the pictures.  My design wall is directly across from the window that is the primary light source for my photos, so when taking close ups my choices are to be at a really weird angle (bad) or be straight on but have horrid camera shadows in the pictures.  My dad said he'll help me with some other light sources the next time I'm at their house, but in the interim, I'll keep on like this!


Those little orange flowers and the adjacent swirls are some of my favorite patterns.


I also really like the metallic thread (on the right above) with the pink, although the metallic is hard to see in the picture.  It's actually Ricky Tim's Razzle Dazzle, which is fun for bobbin quilting.


In this one you can see the area I started in with actual quilting thread and smaller stitches; it was all right but I like the bolder embroidery floss better.


Finally, this is the back.  It quickly became evident that it was not going to be a two-sided quilt.  While the back looks pretty good (as backs go) it is definitely not another "front."  In the end that was fine with me though, it saved me the trouble of having to work out something else for the label and hanging pocket.

And now, another thing crossed off the UFO list!  I have so many projects I want to start but there are still 4 big ones (#1, 3, 4, and 6) still to go before I start another big something.  I was originally going to work on the dogs next, but I think maybe I'll try to finish #6 first.  We'll see how brave I become with FMQ on the home machine!


1. Purple Medallion Quilt:  Status- top pieced, needs to have faux trapunto and machine quilting.
2. Hawaiian Applique Quilt: Status-top pieced, sandwich made, some quilting done.  Needs to have Zendoodling quilting done and finished.
3. Dog Portraits: Status- two dogs thread painted, need to finish thread painting, assembly, and quilting.
4. Nativity Mosaic Quilt: Status- Mary and Joseph are mosaic-ed, everyone else needs to be tiled in and finished.
5. Visions of God Group Church Quilt: Status- All the blocks but 3 are sitting in a pile on my desk.  I need to get  three more blocks and then assemble/quilt it.
6. Large S Quilt: Status-Top is finished, needs to be blocked and quilted.
7. Small Caryl Fallert Blocks: Status-Miscellaneous blocks need to be quilted/finished and donated.
8. Grandmother's Flower Garden Project: Status-Not even sure what this is going to be, but I have been piecing a bunch of grandmother's flower garden blocks and need to do something with them.

9. Miniature Whole Cloth Quilt: Status-about 2/3ds finished, need to find some ribbon to quilt with and maybe some perl cotton.


Do you guys have any hand quilting projects underway?  What about freehand embroidery?   I enjoyed this project, but probably won't do another one like it for a while!

Friday, September 9, 2011

Ruched Pouch and Needle Case

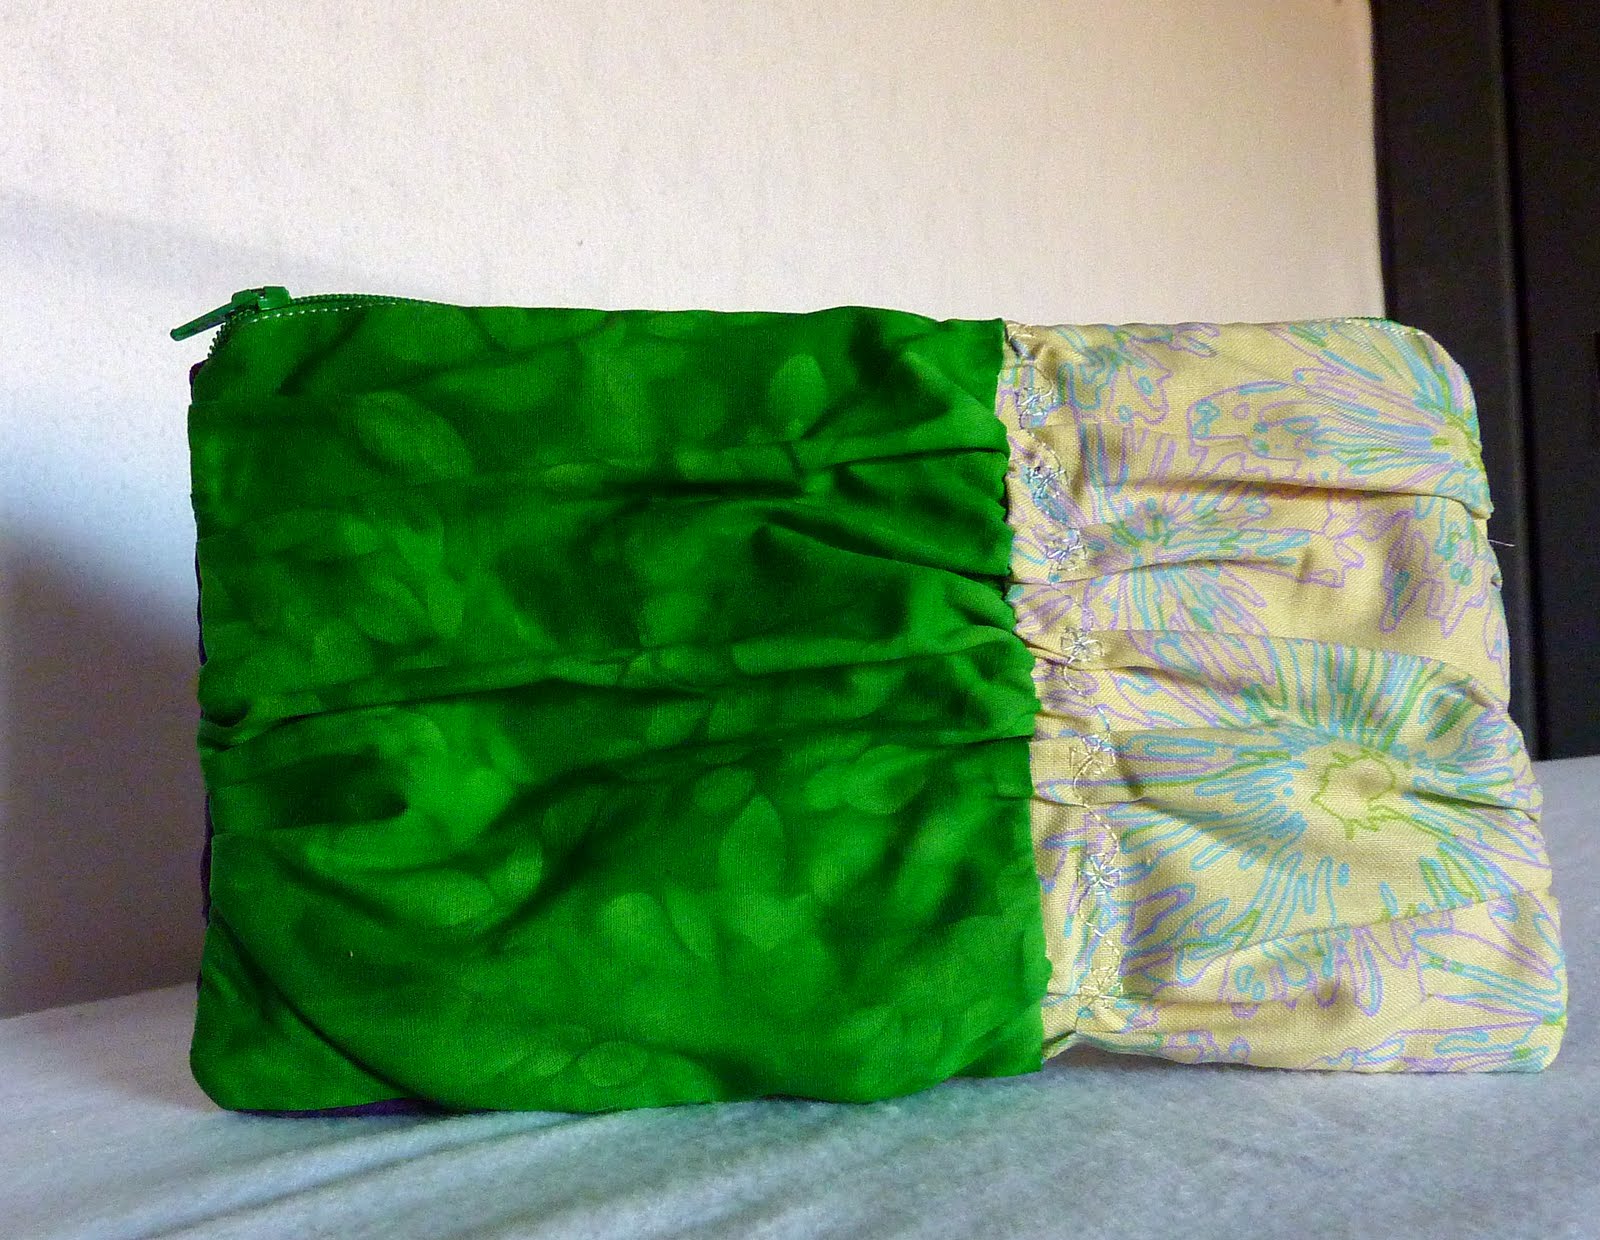
Here are two fun blogland-inspired small projects I whipped up for my mom for her birthday.  The first is a pouch I'd been dying to try for a while.  Ever since I saw this fabulous ruched pouch, I've been excited to try something with gathers and thought this would be a great time.

There's an excellend tutorial for it over on Sew Mama Sew, but I sort of assembled it on the fly.  Basically I cut a piece of muslin the size I wanted my outer panels to be then cut my purple/green/print rectangles a few inches taller than that.  I sewed the print and solid together for each side using great big stitches, and basted along the ends.  Then I gathered up the two ends and the middle, pinned them to the muslin and stitched around the edge using a smaller-than-usual seam allowance (somewhere between 1/8th and 1/4 inch).  I used a decorative stitch to stitch down the gathers in the middle so they didn't flop about and then did the pouch assembly just like usual.

Given my love of color, I couldn't just use the same thing on both sides, so I used a green tone-on-tone floral with the print on one side and a purple tone-on-tone plaid with the print on the other side.  I like the way it came out-and it wasn't any harder to construct than a regular pouch!


The next little project I made was a needle case.  This time I did follow the tutorial over on Sew She Sews and it went swimmingly except that I assembled it upside down.  Since I was making one for me and one for my mom, I actually assembled it upside down TWICE (go Shannon), and was much saddened to have to disassemble it.  It was either that or have the nice quilted part on the back, or have it open on the left.  Yuck.  But in the end it all worked out well.  And bonus- a completed project in a neutral color scheme!  I did do all the quilting before I cut the pieces apart to make the two cases, I wish the quilting motifs had lined up a little better but there you have it.


Hope you enjoy!

Wednesday, September 7, 2011

It's My (Mom's) Party

I hope everyone had a great labor day holiday.  I've been jumping out of my skin with excitement (and cleaning) for the last two weeks waiting eagerly for the impending visit of my parents, sister, and brother-in-law who were all coming from out-of-state for the long weekend.  My mother is a potter by profession (you can check out her fabulous work on her somewhat outdated website here), so was coming out primarily for an arts festival.  It was so good to see them all, and I'm very sorry they've gone again.  

My sister had some fabulous news of the new-family-member variety; we'll be welcoming the first new niece/nephew/grandbaby to this wing of the family sometime in March, so as you can imagine I was pretty (super-fabulous-squealing) excited.

In addition, over the weekend we celebrated my Mom's birthday as well as those of my uncle and grandfather.  I made a few small things for my mom and thought I'd share them in the next couple posts.

First up are some fun-but-simple birthday cards- I'm not much of a scrapbooker, but I really do like making cards.  Recently I started combining paper and fabric with (I think) really cute results.  In each case, I cut the fabric out, glue stick it to the cardstock, then blanket stitch it down.  It's pretty much raw-edge machine applique on a birthday card.  The final step is to take folded fabric or ribbon and sew it around the edge to create a clean finished look.  In order to avoid having to write your greeting over the stitching (on the inside of the card), I usually glue a piece of cardstock in a contrasting color into the inside and then make sure to catch it when I'm sewing the binding on.  I found out that ribbon makes a great binding since the edges are finished, and I thought this red-maroon looked nice.

My Uncle Kenny is a roper, so I put a green horse on his card.  My grandpa likes to fish; so a couple of smiling trout (my interpretation-ha!) for him, and a blue fabric snowflake for my mom.  For the snowflake, I didn't want to sew around all the edges, and I was worried that I might not be able to get glue on the whole thing evenly, so to avoid having some stuck edges and some floppy edges, I put fusible web on the fabric before cutting it out and then just fused it to the cardstock (just like fusing to fabric).  I didn't take pictures of the backs, but the lake (on the fish card) and the snowflake both go around to the back of the card which I think gives a more complete look.


So there you go!  Instant colorful greeting cards limited only by the scraps in your scrap bag!  One thing I'd recommend is using an old sewing machine needle and changing it out after this project before trying to sew "real" fabrics again.  I think sewing through the cardstock really dulls the needles.

Ridiculous side story:  I made all the cards together early last week then set them aside and checked "make birthday cards" off my to-do list.  I didn't pick them up again until Friday night when I handed my mom hers along with her present.  Imagine my embarrassment when she opened it up to find I hadn't written anything on the inside.  Not even my name.  Completely blank.  Apparently I hadn't filled in any of them.  Total fail.

What about you guys- any fun Labor Day action?  Embarrassing project stories?  Great greeting card ideas?  Feel free to share!

Friday, September 2, 2011

More Pink!

My sewing room is pretty full.  My dearest wish is to own a longarm quilting machine, but it would require a house addition in order to have somewhere to store it.  I really am lucky to have an extra room I can dedicate to crafts, but it really doesn't have any extra space.  One of my recent acquisitions was an overhead projector which my lab was going to send to surplus.  I gleefully took it home and now use it as a light box and as a projector for blowing up patterns and stuff.  However, I didn't have anywhere to put it.  I'd been storing it on my kitchen footstool, which made the height of the projector all right for working, but meant that every time I needed the stool I had to move the projector.

Then a couple of weeks back, my fabulous friend Linda decided to have a garage sale.  It was a monumental undertaking, sufficient to fill an entire blog post on its own, but the upshot was that she let me have this great little three drawer nightstand thing.  It was the perfect size to hold the projector and still fit under the shelf where it has to live.  Bonus, it has drawers (albeit small) for extra storage.  I gleefully took it home and returned my foot stool to the kitchen.  Sorry, all the initial pictures were taken on the fly with my iphone, so they're pretty wretched.


The nightstand was part of a smallish set, sort of country chic-ish.  Very nice but not my style at all.  I don't think it was Linda's style either, thus the garage sale-ness.  Anyhow, since it was going in my sewing room with the recently refinished bookcase and I had leftover paint from that project I decided to fix up the nightstand to match.  I only had a little bit of the light grey left so used it for the top of the night stand, and used pink on the rest.  I'm still a painting novice, but the finish was pretty woody to begin with so I didn't sand or anything.  It did take 5 coats of pink paint to cover over the dark green, but finally came out very cute.  The drawers don't slide quite as well as I'd like after being repainted, but they work.  If anyone knows a secret to that part I'd love to hear it!

After painting I went off to Hobby Lobby where I was lucky enough to encounter the last day of a 50% off all  drawer hardware sale.  I went ahead and bought six complete sets of hardware, figuring I'd return whichever ones I wound up not liking.  I even thought for a while I might mix and match.   I'm so glad I bought all the different ones; the drawer pulls I fell in love with in the store were not the ones I wound up liking best on the nightstand!


Those fabulous flower ones are the ones I fell in love with at the store (top right in the first drawer pull picture), and in fact, when I returned all the unused ones, I kept two of those just because sometime I think I'll find something cool to do with them.  I'd also really loved the clear green and purple flower ones (top left-the purple looks sort of black in the crummy picture) in the store.  In the end though, the bright pink sort of showed through all the glass ones, kind of muddying the look.  The surprise (to me) winner, were the black and white ceramic ones.  The grey accent around the white goes well with the light grey top and they provide great contrast!


So there you have it!  More pink for my sewing room.  Poor Mike is feeling a little over-saturated I think since he works in there some too.  But my pink and grey paint are just about used up now, only enough left for a few touchups, so I think I'm done with these colors at least.   Hopefully soon I'll have some pictures of the whole sewing room to show.

What about you guys- have your favorite something turn out to be totally not what you were thinking? Which drawer pulls do you guys like best?